zTotal
“Total” Sites Guide
This zTotal Web Site Guide for our “Total” line of web sites is a work in progress, so
please forgive any typos or other mistakes. Because these sites are so cutting
edge, the online manual and many of the help features have not been completed. If
you have any questions about your zTotal web site, please contact us at director@ztotal.com or call 870-403-7718.
Thanks,
Your zTotal
Staff
Return to zTotal's Home Page
Our web sites can be used by those with little or
no computer knowledge or experience. All
features are activated via simple menus, and most tasks are basic point and
click operations. No programming knowledge of any kind is required.
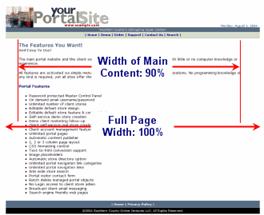
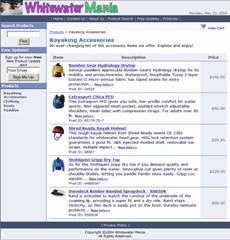
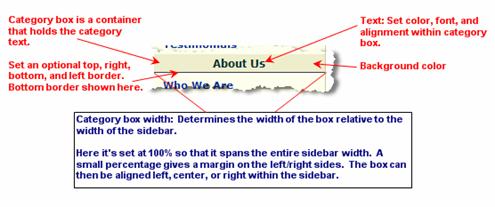
This
screenshot shows the customizable elements on all main pages. Main or portal pages refer to all pages
except product pages.
In
addition to complete CSS control over all the customizable page elements, you
can also specify custom CSS commands in the <head> section as a default
setting for all pages. The same applies for custom javascript. HTML works in
most locations on most pages. If you
don’t understand the preceding, it’s ok, because you don’t need it.
Admin Control Panel
From
here you can:
- Customize the layout & look of the store
- Add/edit custom content pages
- Add/edit product listings and photos
- Customize shopping cart options
- Customize shipping options & sales tax
rates
- View & print customer orders
- View & print store activity reports
Password
protected with automatic timeout, point-and-click ease of use, user preference
settings and contextual pop-up help, the Admin Control Panel is where you
manage your store.
Automated Store Design & Content
Management
Your
store can have it’s own customized color scheme, logo
and overall look. The tools at your disposal include:
- Customizable 1, 2 or 3 column page layout
- Customizable navigation support
- Up to 100 content pages
- Automated content publisher
- Automated Cascading Style Sheet (CSS)
formatting
- Automated text-to-html conversion support
- Easy to use image placeholders
Structured Merchandising Support
We
make it easy to categorize, search, navigate and display an unlimited number of
products in each store:
- Up to 50 product categories
- Numerous product listings
- Categorized product catalog with thumbnails
- Product search
- Email-a-friend product recommendation
- Visitor contact form
- Visitor mailing list email capture
- Search engine friendly web pages
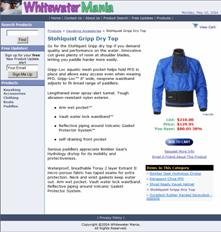 Flexible Product Display Options
Product
listings feature:
-
Unlimited
description detail
- Unlimited
options (size, color etc)
- List
price/discounted price display options
- Up to 7
product images plus thumbnail
- Optional
product specific visitor contact form
- Optional
intra-category product navigation
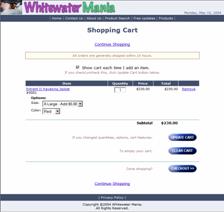
Shopping Cart & Order Processing
Every
store has it’s own optional shopping cart and order
processing facilities. The proprietory cart system integrates seamlessly,
maintaining the look and feel of the store even as web site design changes are
made.
- Customizable shopping cart
- Customizable multiple shipping options
- Customizable multiple sales tax configuration
- Easy 3 step checkout procedure
- SSL secure store & alert order processing
- Duplicate order notification option
|
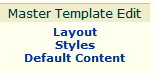
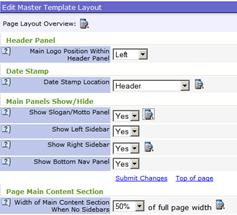
Return
to the control panel window, and click on the ‘Website’ link in the page header.
Next,
select ‘Layout’ from the Master Template Edit submenu on the
left hand side navigation panel.
Note
the breadcrumb trail at the head of the page that always shows where you are
in the control panel. For example, now it should read like this:
|
|
Menu Command: Main > Website >
Master Template Edit> Layout
|
Also
note that portal and store control panels feature contextual help.
 Mouseover this help icon whenever it appears next
to control panel admin commands to read command specific help. Mouseover this help icon whenever it appears next
to control panel admin commands to read command specific help.
|
|
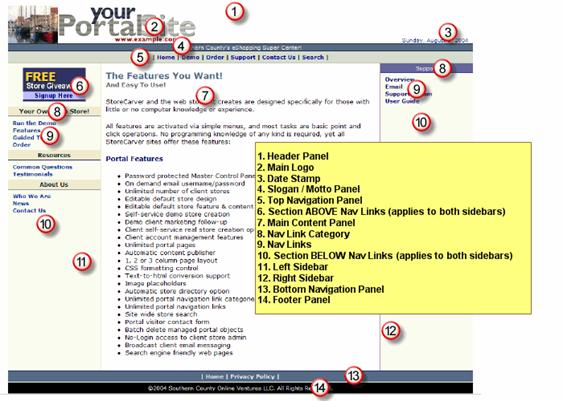
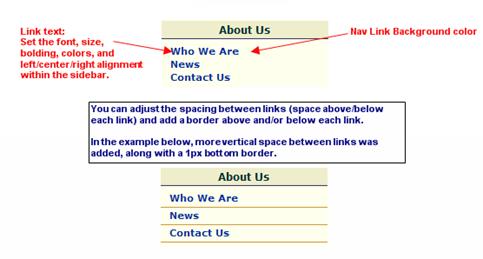
The
following panels show some of the ways you can customize your web site.
1. Editing the Template Styles
The
second class of items you can change on the default portal pages are style
elements. These are all the elements controlled by Cascading Style Sheets (CSS),
principally choice of font, font size, and colors for various elements.
Select
Website > Master Template Edit >
Styles on the MasterAdmin Control Panel and you will see the following:
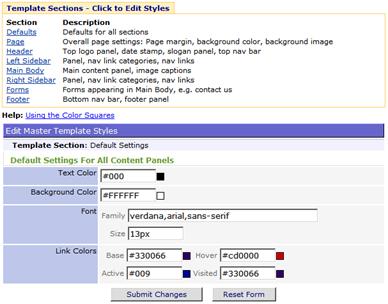
The
Template Sections links at the top simply lead to submenus for each of the
relevant page elements, which are similar to the first one shown above –
Default Settings for all content panels.
Many
of the style settings relate to your choice of color for page elements.
Clicking on the small color square adjacent to color hex number settings will
launch a color selector with the existing color setting pre-selected:
To
change the color setting for that element, simply click on one of the color
squares, or enter the hex number into the field at top (works directly on the
control panel as well).
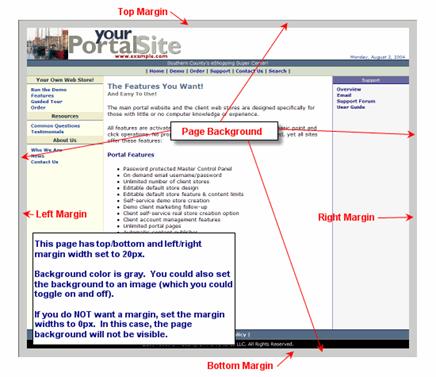
Edit Main Pages Template Styles – Overall
Page Settings
You
can set a background image or background color for all main pages. As shown in
this next graphic, you do this by specifying page margins.
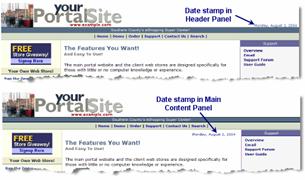
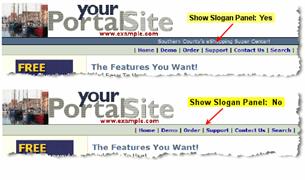
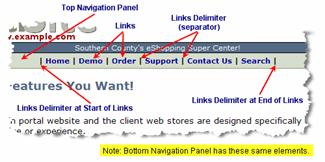
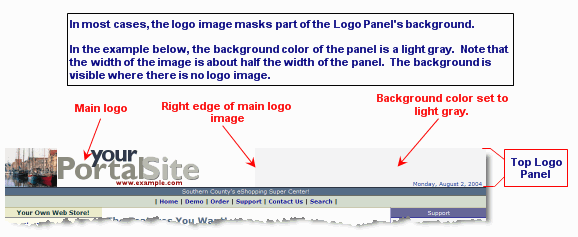
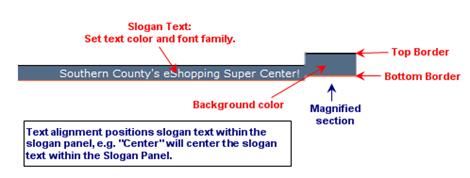
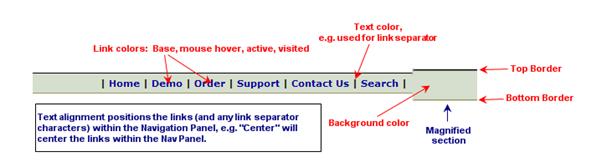
Edit Main Pages Template Styles – Header
Elements
In
the next section, you can set styles for the top logo panel, date stamp, slogan
panel, and top navigation bar.
Our
pages are formatted to fill available screen width on a % basis. So although
there is no maximum logo width, in most cases logo width should be formatted
for 400 to 800 pixel display with a solid color at the right hand end to blend
with the background color you specify for the logo panel for higher
resolutions.
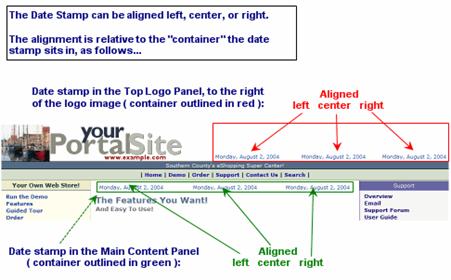
- Date
Stamp Location and Alignment
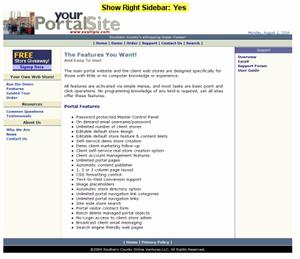
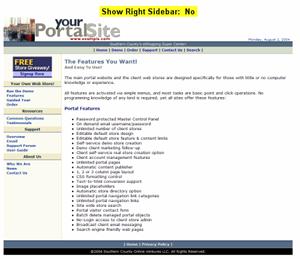
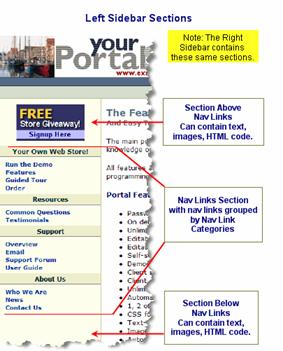
Edit Main Pages Template Styles – Left
Sidebar
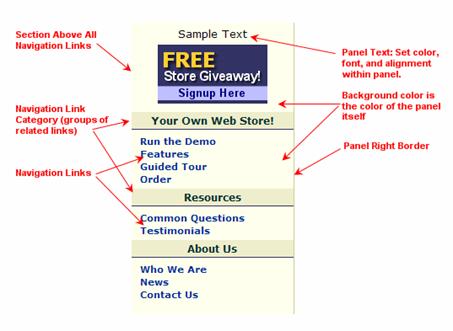
- Navigation
Link Categories
Edit Main Pages Template Styles –
Main Body Panel
Set
font family, color, and size for page headlines, subheads and body text,
hyperlinks and image captions.
Edit Main Pages Template Styles –
Right Sidebar
Set
styles for the same elements as for the Left Sidebar (see above).
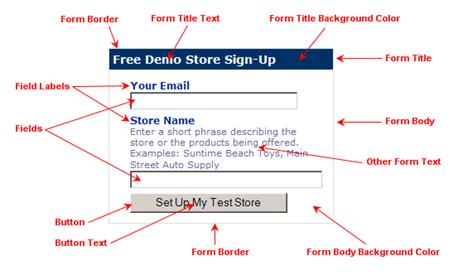 Edit Main
Pages Template Styles – Forms
Edit Main
Pages Template Styles – Forms
Set
styles for title, body, field labels and other text used in forms (eg Contact,
Search etc) used on portal pages
Edit Main Pages Template Styles –
Footer
Set
font family, size and color for the bottom navigation panel links and footer
panel text.
Edit Main Pages Template Default Content
Select
Website > Master Template Edit > Default Content to enter settings
for:
- Default Keyword,
Description and Other meta tags on all portal
pages for search engine optimization (can be customized when
creating/editing individual portal pages).
- Default custom
JavaScript for the <head section> of all portal pages.
- Default custom
Cascading Style Sheet commands for the <head section> of all portal
pages.
Create, Edit or Delete Main Pages
Our site supports the creation of an unlimited
number of portal pages. Feel free to add your own page(s) and content.
To create a new main page, select
:
Website
> Web Pages > Create
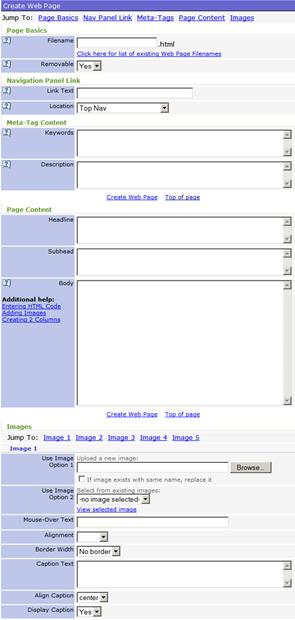
You have complete freedom in naming new web pages .
. . with the obvious exception that two pages cannot have the same name. (Our
program will not allow the same name, and you have a link available to recall a
list of all existing filenames).
You can also rename existing pages (via the Edit
feature).
Note that you can set custom meta
tags for each page.
Again, mouse over the
help icons for context sensitive help. The Page Content section has links for additional
help on entering HTML code, adding images and creating 2 column layouts in the
body of your web page
Each page has sections dedicated to recording the
details of up to 5 images to be embedded in the body of the page by entering
placeholder tags |image1|, |image2| etc into the Page Content edit area.
Optionally specify image mouse-over text, captions,
alignment and borders.
 Click any of the Create Web Page links or the
button at the foot of the page, and Storecarver will display an alert advising
that the page was successfully created and offer a link to open the page in a
new window
Click any of the Create Web Page links or the
button at the foot of the page, and Storecarver will display an alert advising
that the page was successfully created and offer a link to open the page in a
new window
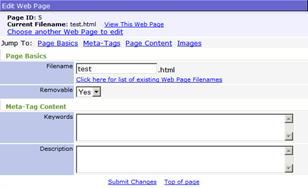
Editing
Existing Main Pages
If you want to make changes to a page you just
created (or any other page), you need to do so via the Edit feature:
Website
> Web Pages > Edit
You will be presented with a list of existing pages
to choose from, which will take you to all existing page data for editing.
If you don’t already have a copy open, click the View This Web Page link at the head of
this edit screen (beside ‘current filename’) to open the subject page in a new
window. Using the following directions, you can make changes to the page and see the changes made.
Click
the Submit Changes link at any one
of the 7 locations on the edit screen and then click the browser Refresh or Reload button in the toolbar of the
window displaying the web page to have the page updated with the latest
changes. Working with 2 windows open this way makes page editing go a whole lot
faster.
Main Pages Navigation Links and Categories
Add, edit and delete custom navigation links to
provide a navigation path to content pages throughout the portal. Links may be
added to top, left, right and/or bottom nav panels.
External, https and mailto links are supported, and
all links can be organized into editable categories on left/right nav panels.
Deletion of a content page automatically removes
any navigation panel link associated with that page as well.
Add, edit or delete portal nav link categories:
Website
> NavLink Categories > Add/Edit/Delete
Add, edit or delete portal navigation links:
Website
> Navigation Links > Add/Edit/Delete
Main Pages Image Gallery
We feature a dedicated image library where you can
upload images 5 at a time for storage and later reference via the page creation
and editing facilities already covered above.
Those stored images can then be called and placed
anywhere on any portal page using placeholder tags (|image1|, |image2|, etc.) that
you enter into the body content field for the page.
Embed up to 5 images in content page body and
another 10 each in left/right navigation panels (25 images total per page . . .
but add even more by manual html coding).
Note that the Image Gallery makes it possible to
use the same image on more than one page.
To upload new images, select Master Website > Image Gallery > Upload
Return to zTotal's Home Page